Introducing the NXTBee.
- What is the NXTBee used for?
- What do the NXTBee and NXTBee Pro look like?
- How is the NXTBee connected to an NXT Robot?
- How can we test the NXTBee wireless connection using NXT-G?
- How can we test the NXTBee wireless connection using RobotC?
- How can I get my hands on an NXTBee?
1. What is the NXTBee used for?
The NXTBee facilitates wireless communication between LEGO NXT MindStorms Robots.
1.1 Any Alternatives?
The Bluetooth that is supplied as standard with the LEGO NXT sets is an alternative. Under ideal conditions (flat ground, no wireless interference, no walls or obstacles between the NXT robots) Bluetooth can be used for communication between 4 NXT robots (1 master, up to 3 slaves) up to a distance of about 15 - 20 feet (4.5 - 6 meters). Under similarly ideal conditions, Dexter Industries claims the NXTBee is good for about 64,000 connections over about 300 feet (91 meters), and their more powerful NXTBee Pro for about a 1.2 km. (3/4 mile) range. Under bad conditions, Internet comments suggest a maximum range of about 1/10 these distances or perhaps even less.
2.1 What does the NXTBee look like?
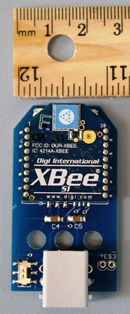
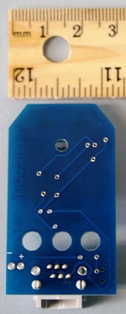
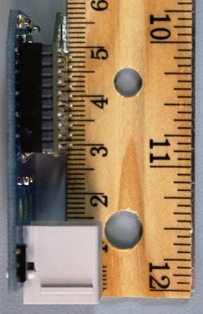
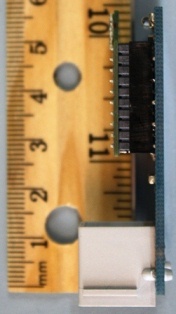
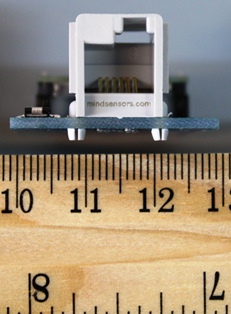
The photographs are (from left to right) NXTBee top view, bottom
view, left view, right view, near end view and far end view. The
distances marked on the ruler are centimeters and inches. YouTube, a
wmv movie
and an mp4 movie with similar information can be seen below (19
seconds); note that some videos can be expanded to a full screen
by clicking on
![]() or
or
![]() in
the lower right-hand corner of the movie screens:
in
the lower right-hand corner of the movie screens:
or Movie(wmv), Movie(mp4)
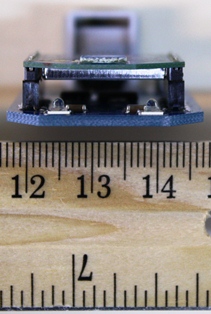
2.2 What does the NXTBee Pro look like?
Basically this is a modified longer-wireless-range version of the NXTBee, with the circuit board being virtually the same size as the NXTBee. It adds an extra silver-coloured bracket for holding a 9-volt battery, a white socket for plugging in the battery, and a small black aerial that can be seen protruding from the top of the NXTBee Pro circuit board. The movies below show the NXTBee with, and without, the 9 volt battery attached.
or movie(wmv), movie(mp4)
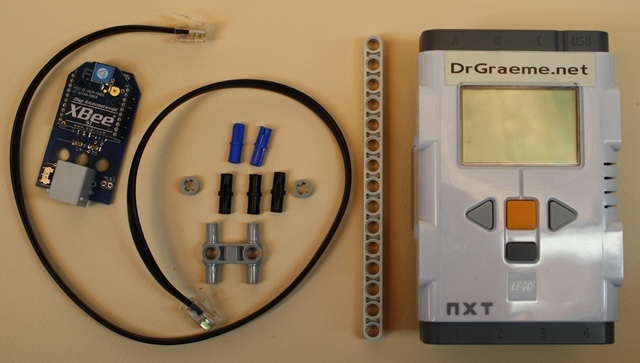
3. How is the NXTBee connected to an NXT Robot?
The NXTBee is connected to the LEGO NXT Computer Brick's slot 4 (NOT slots 1, 2 or 3) using a standard LEGO cable. There are many ways of building the NXTBee into a LEGO model, one of the simplest is illustrated in the image and videos (2 minutes, 36 seconds) below); note that the YouTube video can expand to a full screen.
or Movie(mp4)
Technical note: The reason the use of slot 4 is necessary is that the LEGO computer brick has some extra internal electronic circuitry linked to slot 4, allowing the NXTBee to operate at a higher speed than would be possible if slots 1, 2 or 2 were used.
4. How can we test the NXTBee wireless connection using NXT-G?
This portion of the tutorial assumes that you are reasonably familiar with LEGO's NXT-G software that is used for controlling LEGO NXT MindStorms robots. If this is not the case, go to 4.6.
4.0 Summary of Test Steps 4.1 to 4.5
To enable us to check if our NXTBees are working, we need two robots similar to those shown in 3. above.
Next we need to add two pieces of special software to our LEGO MindStorms editor. The first is a block that will appear in one of the editing menus, this is necessary to allow the LEGO NXT-G editor to control the NXTBee (see 4.1). The second is special Firmware that must also be added to the LEGO NXT-G editor, to allow it to be subsequently downloaded into the NXT computer brick, this is necessary to allow the NXTBee to use the NXT computer brick's special high-speed port 4 (see 4.2).
Next we need to write and test two programs. The first is a program to send a wireless signal from an NXTBee attached to our first robot (see 4.3). Following that, we need to write a program to receive a wireless signal via an NXTBee attached to our second robot (see 4.4). We can then test the wireless connection by running both robots at the same time, and checking that we can pass a wireless signal from one to the other using signals broadcast between the two NXTBees (see 4.5). We will now consider each of these steps in more detail.
4.1 Adding the NXTBee Control Block to your LEGO NXT MindStorms Editor.
When you open up your NXT MindStorms program editor, you will see
many blocks in the menus to the left of the editor screen. What we
need to do now is to install another block, an NXTBee control block.
Use of this block will allow us to control the NXTBees attached to
our NXT robots. We can download the block from the Download
section of the manufacturer's web site,
www.DexterIndustries.com. The block will be downloaded as a
".zip" file. We will need to unzip this file, and then use the
editor's
Tools/Block Import and Export Wizard... menu
options to
add the block to our Editor. The video below demonstrates this
process. Note that these videos can be expanded to a full screen
by clicking on
![]() or
or
![]() in
the lower right-hand corner of the movie screens.
in
the lower right-hand corner of the movie screens.
or movie(wmv), movie(mp4).
4.2 Downloading NXTBee Firmware and adding it to your NXT Computer Brick.
Your NXT Computer Brick has an "operating system" that is usually called "firmware". This firmware is pre-installed inside your NXT Computer Brick by LEGO before the Brick was sold to you. LEGO updates this firmware available periodically, maybe once or twice a year. Unless you have problems with newly-released sensors, checking and updating your Computer Brick's firmware about once or twice a year is probably sufficient (schools often schedule any changes like this before the start of term).
To check the version of software used by your LEGO computer brick, you start up your NXT program editor, and click on the menu option Tools/Update NXT Firmware... A window that includes a list of files with titles something like "LEGO_MINDSTORMS_NXT_Firmware V1.28" will appear. These are your "firmware" files, ready for download into your NXT Computer Brick. At the time of writing this note (September 2011) the most recent firmware produced by LEGO is "LEGO MINDSTORMS NXT Firmware V1.31". If you do not see this in your list of firmware files, it is worth adding this to your editor. You can see a tutorial that will assist you to do this by clicking here.
However even if you have the latest firmware supplied by LEGO, it will not be enough to get your NXTBee operating. The reason for this is that your NXT computer brick has had special additional circuitry allowing high-speed communication added to the computer brick slot numbered 4. This has not been able to be used up until now, when some marvelous work by Andrew Milluzzi and John Hansen has made this extra high-speed circuitry available for use by the NXTBee. This is the reason the NXTBee will only work when plugged in to computer brick slot 4. You need this special firmware installed in your computer brick to be able to use the NXTBee.
To get this special NXTBee-specific firmware, we follow the steps
in the video below. Note that these videos can be expanded to a full screen
by clicking on
![]() or
or
![]() in
the lower right-hand corner of the movie screens.
in
the lower right-hand corner of the movie screens.
or movie(wmv), movie(mp4).
4.3 Setting up the first Robot to send a signal.
The folders we downloaded from the Dexter Industries web site
contain sample "Send" and "Receive" NXT-G programs. In the videos
below, we open and explain the "Send" program. This program uses a
"Text" block to send the text "Test123" to the NXTBee block which is
set into "Send" mode. Remember that this program will not work
unless your editor and NXT robot are set up as illustrated in steps
4.1 and
4.2 above.
These videos can be expanded to a full screen
by clicking on
![]() or
or
![]() in
the lower right-hand corner of the movie screens.
in
the lower right-hand corner of the movie screens.
or movie(wmv), movie(mp4).
4.4 Setting up the second Robot to receive a signal.
The folders we downloaded from the Dexter Industries web site
contain sample "Send" and "Receive" NXT-G programs. In the videos
below, we open and explain the "Receive" program. This program
listens for data sent from the NXTBee attached to the "Sending" NXT
robot. Remember that this program will not work
unless your Editor and NXT robot are set up as illustrated in steps
4.1 and
4.2 above.
These videos can be expanded to a full screen
by clicking on
![]() or
or
![]() in
the lower right-hand corner of the movie screens.
in
the lower right-hand corner of the movie screens.
or movie(wmv), movie(mp4).
4.5 Sending a test signal between the two Robots.
The final test is to see if all the work we have done so far is
successful. The "Send" program of 4.3 has been downloaded into the
"DrGraeme.net" NXT robot on the left of the video below, and the
4.4
"Receive" program has been loaded into the "YayaLu.net" NXT robot
seen on the right of the video. The "Receive" NXT is started first,
and then the "Send" NXT. You will have to watch the video to see the
result! These videos can be expanded to a full screen
by clicking on
![]() or
or
![]() in
the lower right-hand corner of the movie screens.
in
the lower right-hand corner of the movie screens.
or movie(wmv), movie(mp4)
Sorry that the NXT computer brick screens were not very clear, but the "Text123" DID actually appear on the "YayaLu.net" robot's screen, honest!
This concludes the videos relevant to NXT-G combined with the NXTBee. The remainder of the videos illustrate using NXTBees with RobotC. Now go and have fun with your NXTBees...
4.6 What can I do if I am not familiar with NXT-G and want to use it?
NXT-G is the software supplied by LEGO to control their NXT MindStorms robots. If you want a free introduction to NXT-G, free tutorials are available on this DrGraeme web site here.
5. How can we test the NXTBee wireless connection using RobotC?
This portion of the tutorial assumes that you are reasonably familiar with either RobotC 2.0 or RobotC 3.0. If this is not the case, go to 5.4.
To enable us to check if our NXTBees are working, we need two robots similar to those shown in point 3. above. Next we need to download a program into each of these robots. Thanks to Xander Soldaat, we have drivers that enable the NXTBees to work with RobotC, and I'd like to acknowledge my debt to Xander's work as I have used variations of his examples (but any faults are mine!) If you have RobotC 3.0, Xander's drivers are already built in, but if you have RobotC 2.0, you need to download Xander's drivers yourself. You can download the latest set of Xander's drivers from here; (if you are especially interested, details of the other sensors that are covered by Xander's driver set can be seen here, but this knowledge is not necessary for this check of the operation of your NXTBees).
5.1 Setting up the first robot to send a signal.
First we have to choose what type of signal we want to send
between the robots. There are lots of approaches we could take, but
since we just want to check if the sensor works, probably the
simplest approach is to send and receive a single character, e.g.
"A", "a", "z", "Q" etc.. Next we have to decide how we will know if
the signal has been both sent and received. While it is possible to
(e.g.) control motors, and turn sensor lights on and off etc., we
will again take the simplest approach and just print the characters
sent and received on the NXT robot screens. The following video
discusses the RobotC program, it is about 7 minutes long, but only
the first 4 minutes are important. Note that the videos can
expand to a full screen if
![]() or
or
![]() is clicked.
is clicked.
The RobotC 2.0 program discussed in this video is:
/***********************************************\
|*  This program will send one character at a  *|
|*  time to the receiving NXT robot that is    *|
|*  also equipped with an NXTBee, displaying   *|
|*  the characters on the sending NXT's LCD    *|
|*  screen as a character and a denary integer.*|
|*  Saved as NXTBee-Send-Character-V4.c        *|
\***********************************************/

void SendCharacter(char myChar)
// This is not a very efficient way of sending characters.
// However I've found it be a useful starting point
// for first-time users; as it hides the complicated code.
// Get users going first, efficiency later! (-:
{
  nxtEnableHSPort();               //Get NXT High Speed Port #4 ready
  nxtSetHSBaudRate(9600);          //Xbee Default Speed, 9600 baud
  nxtHS_Mode = hsRawMode;          //Set to Raw Mode (vs. Master/Slave Mode)
  nxtDisplayTextLine(1, "Sending: %c, %i",(char)myChar, (int)myChar);
	                           //Debug: display on sending NXT LCD what is being sent
  nxtWriteRawHS(myChar, 1);        //Send the character (myChar=char to send, 1=length of data)
  wait1Msec(1000);                 //One Second Delay (long enough to read character)
  nxtDisableHSPort();              //Close High Speed Port #4
}

task main()
{
  char secondChar = 'a';            // Character to be sent can be named
  SendCharacter('Y');               // Character can also be sent directly
  wait1Msec(1000);                  // One second delay
  SendCharacter(secondChar);        // Send named character
  wait1Msec(1000);                  // One second delay
}
Technical note:
In the procedure "SendCharacter" that I have modified from Xander's
original (thanks Xander), I open and close the wireless channel
every character sent. This is not at all efficient. However it does
simplify the task of new users who are just starting to use the
NXTBee. Advanced users wanting to transfer lots of data quickly
should go back to Xander's more efficient original code. New users
will find the code above much easier to use.
5.2 Setting up the second robot to receive a signal.
A second robot was assembled, using a build similar to that shown
in point 3. A RobotC program was written to listen for characters
sent from the NXTBee attached to the first NXT robot. That listening
program is discussed in the following videos. If you are just
interested in getting wireless transmission between the two robots
working, only listen to the first 3 minutes or so of the video. If
you want a rough outline of the gory details of how the characters
are received, you can watch the rest of the video, but this is not
necessary at this stage. Note that the videos can
expand to a full screen if
![]() or
or
![]() is clicked.
is clicked.
or Movie(wmv), Movie(mp4)
The RobotC 2.0 program discussed in the videos above is:
/**********************************************\
|*  This function will wait until it receives *|
|*  a character. It will then make myChar     *|
|*  equal to that character, and set          *|
|*  ReceivedCharacter = true.                 *|
|*  Saved as NXTBee-Receive-Video2.c          *|
\**********************************************/
bool ReceivedCharacter(char &myChar)
{
  bool dataWaiting = true;              // Waiting for a character
  nxtEnableHSPort();                    // Open High Speed Port #4
  nxtSetHSBaudRate(9600);               // Xbee Pro Default Speed
  nxtHS_Mode = hsRawMode;               // Set to Raw Mode (vs. Master/Slave Mode)
  ubyte incomingData;

  while(dataWaiting)                    // No characters found so far
  {
    if(nxtGetAvailHSBytes())            // Check to see if we have any data coming in
			     {
      if(nxtReadRawHS(incomingData, 1)) // Ask for the data, save to "incomingData".
      {
		     //If we actually have found data, display it to the LCD
        nxtDisplayTextLine(1, "Receive: %c, %i", (char)incomingData, (int)incomingData);
        myChar = (char)incomingData;    // myChar is now equal to the received character
        dataWaiting = false;            // data found, stop looking
      }
    }
    else  //No Data, Wait a little before trying again
    {
      wait1Msec(25);                    // Wait 25ms before checking again.
    }
  }
  nxtDisableHSPort();                   // Disable HS Port #4
  return true;                          // Character found, receivedCharacter set true
}

task main()
{
  char command;
  while(true)
  {
    if(ReceivedCharacter(command))	//Check to see if we have any data coming in
    {                                   //Display received character "command"
			                //  on the receiving NXT's LCD screen.
      nxtDisplayTextLine(4, "YES!: %c, %i", command, (int)command);
    }
  }
}
Technical note: In the procedure "ReceivedCharacter" that I have modified from Xander's original (thanks Xander), I open and close the wireless channel every character received. This is not at all efficient! However it does simplify the task of new users who are just starting to use the NXTBee. Advanced users wanting to transfer lots of data quickly should go back to Xander's more efficient original code. New users will find the code above much easier to use.
5.3 Sending a test signal between the two robots.
The sending and receiving NXT robots were set up with their
NXTBees attached. The programs were then run - see the 1 minute 12
seconds videos below; (to see the NXT screens more clearly, enlarge
the videos to full screen by clicking
![]() or
or
![]() ).
).
or Movie(wmv), Movie(mp4)
Success!
5.4 What can I do if I am not familiar with RobotC and want to use it?
30-day trial copies of RobotC 2.0 and RobotC 3.0 can be downloaded from here. Some educational material that can start you off with RobotC is available here. Xander has a tutorial showing how to install his driver suite (necessary for many sensors with RobotC 2.0, but already built-in for RobotC 3.0) here, but it is a bit small and his YouTube version (which can be expanded to full screen) is clearer and can be seen by clicking here. If you want me to expand this portion of this tutorial, send me an email to (Graeme at ieee dot org)
6. How can I get my hands on an NXTBee?
You can purchase an NXTBee from Amazon.com by clicking on this image . The manufacturer of the NXTBee is Dexter Industries. Their web site is http://www.DexterIndustries.com . For more information, you can go straight to their NXTBee web page by clicking here. Enjoy!
Free "Introducing the NXTBee" tutorial - copyright Dr. Graeme Faulkner 2011 - www.DrGraeme.net