Introducing the NXT EOPD Sensor.
- What is the EOPD Sensor used for?
- What does the EOPD Sensor look like?
- How is the EOPD Sensor connected to an NXT Robot?
- How can we test the EOPD Sensor using NXT-G?
- How can we test the EOPD Sensor using RobotC?
- How can I get my hands on an EOPD Sensor?
1. What is the EOPD Sensor used for?
HiTechnic's EOPD sensor is used for detecting the distance between the sensor and nearby objects. The name EOPD is an acronym for Electro Optical Proximity Detection sensor.
1.1 Any Alternatives?
Other sensors that can be used to detect objects at a distance include LEGO's Ultrasonic sensor, and several of MindSensor's infra-red detectors such as the NXTSumoEyes sensor. Each of these sensors uses a different media to detect distance. The SumoEyes sensor measures the reflection of infra-red light; the ultrasonic sensor measures distance using high-frequency sound waves, and the EOPD sensor uses pulsed light waves - which sensor you use may depend on your application as each will have an advantage in different environments.
2.1 What does the EOPD Sensor look like?
HiTechnic encloses their EOPD sensor in one of LEGO's standard NXT sensor containers. If you are the proud owner of a LEGO NXT MindStorms set, you will be very familiar with the shape of these sensor containers; however for the sake of completeness, the EOPD sensors are illustrated below.
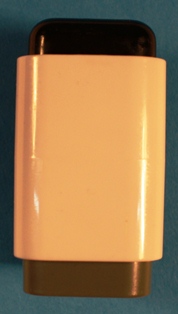
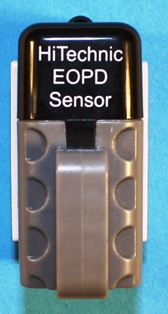

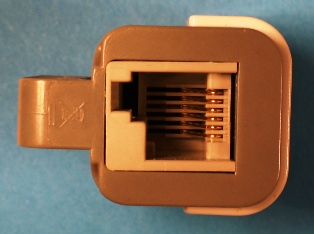
The photographs are (from left to right) the EOPD sensor top view, bottom
view, left view, right view, front view and back view. Because these
encloses are so well known, I have not included a ruler in these
pictures, but for the record the sensors are about 45 millimeters
(about 1 3/4 inches) long. A YouTube, wmv movie
and an mp4 movie with similar information can be seen below (19
seconds); note that some videos can be expanded to a full screen
by clicking on
![]() or
or
![]() in
the lower right-hand corner of the movie screens.
in
the lower right-hand corner of the movie screens.
or Movie(wmv), Video(mp4)
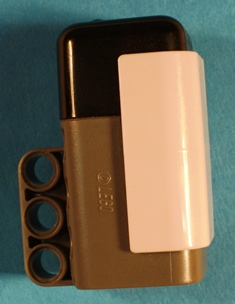
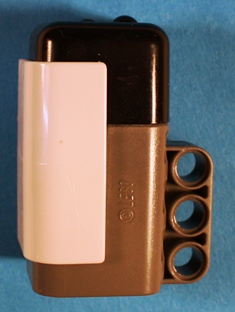
3. How is the EOPD Sensor connected to an NXT Robot?
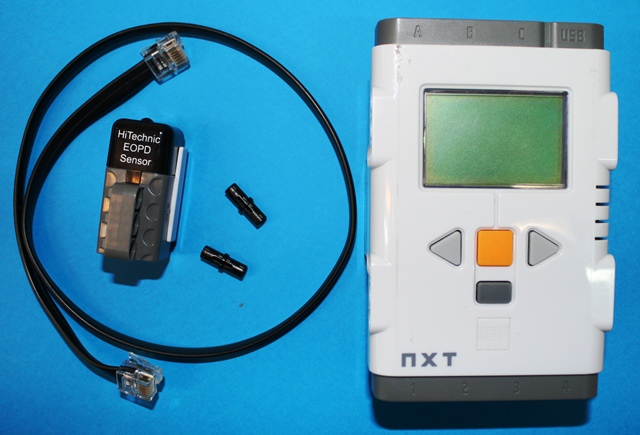
In this series we try to use the least complicated test rigs - this is by far the smallest! The necessary parts are shown below.
Short videos showing these pieces being assembled are available
below. Note that some videos can be expanded to a full screen
by clicking on
![]() or
or
![]() in
the lower right-hand corner of the movie screens.
in
the lower right-hand corner of the movie screens.
or movie(wmv), video(mp4)
4. How can we test the EOPD Sensor using NXT-G?
This portion of the tutorial assumes that you are reasonably familiar with LEGO's NXT-G software that is used for controlling LEGO NXT MindStorms robots. If this is not the case, you can find some graded tutorials here.
4.1 Checking which version of "firmware" is used by your LEGO Computer Brick.
"Firmware" is the "software operating system" that goes inside your LEGO Computer Brick to enable it to function. Your computer brick comes with a version of firmware pre-installed. Periodically, maybe once or twice a year, LEGO releases improved versions of firmware for your LEGO computer brick. It is probably worth checking before the start of each school term, to see if the version you are using is the current one. The process for checking, and how to update the firmware, is covered by DrGraeme videos available here.
4.2 Downloading and installing the LEGO Editor EOPD Menu Block for NXT-G.
Next we have to check if our version of the LEGO editor has an EOPD block
already installed. The following videos demonstrate how to perform
that check. Note that some videos can be
expanded to a full screen by clicking on
![]() or
or
![]() in the lower right-hand corner of the movie screens.
in the lower right-hand corner of the movie screens.
If you already have the EOPD installed as an editor menu option, go to
section 4.3. If you do not see an EOPD menu option, you will need to
install it. This is demonstrated in the videos below.
Note that some videos can be expanded to a full
screen by clicking on
![]() or
or
![]() in the lower right-hand corner of the movie screens.
in the lower right-hand corner of the movie screens.
Now that the EOPD menu block is installed in our LEGO Editor, we can write a program to test our EOPD.
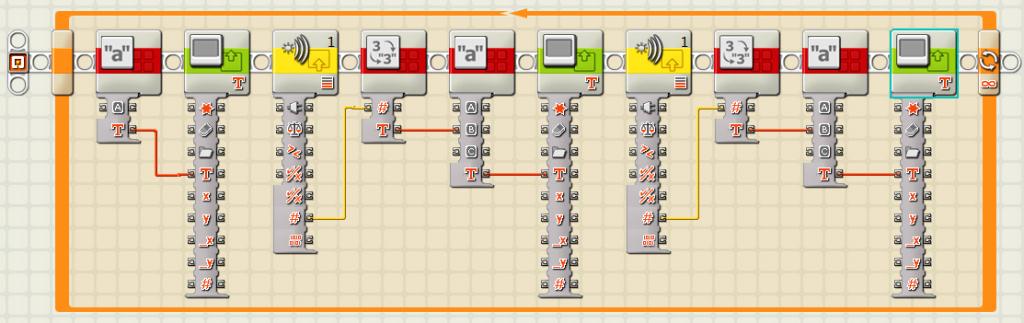
4.3 Writing an NXT-G Program to test the EOPD Sensor
The EOPD can operate in two modes, long range and short range. Probably the clearest way to see how these differ is to write a program that will write both the EOPD's long range and short range readings on to our NXT computer brick's screen. The following NXT-G program will do that.
The videos below demonstrate how to write this program.
Note that some videos can be expanded to a full
screen by clicking on
![]() or
or
![]() in the lower right-hand corner of the movie screens.
in the lower right-hand corner of the movie screens.
or movie(wmv), video(mp4)
4.4 Testing the EOPD Sensor.
5. How can we test the EOPD Sensor using RobotC?
This portion of the tutorial assumes that you are reasonably familiar with either RobotC 2.0 or RobotC 3.0. If this is not the case, go to 5.4.
5.0 Summary
To enable us to check if our EOPD sensor is working, we need a robot similar to the one shown in point 3. above. Next we need to set up RobotC to be able to work with HiTechnic's EOPD sensor (see 5.1). Following that, we need to write a program to test the EOPD sensor (see 5.2), and to download and run that program using our NXT computer test rig (see 5.3).
5.1 How can I get RobotC to recognize my EOPD sensor?
If you have not changed your RobotC compiler preferences, and you want to use the EOPD sensor, it is a good idea to change these preferences to allow RobotC to recognize non-LEGO sensors. To find out how to change your RobotC preferences to allow the use of HiTechnic sensors, click here.
5.2 How do I write a RobotC program to test my EOPD sensor?
At the time of writing (October 2011) the EOPD sensor is not one of the HiTechnic sensors listed as standard by RobotC. This means that the RobotC program below is a little unusual, but it works! Note that if you have plugged your EOPD sensor into a port that is not port 1, the "S1" in first line of the code should be changed to S2 for port 2, S3 for port 3, and S4 for port 4.
#pragma config(Sensor, S1, MyEOPD, sensorAnalogActive)
#include "drivers/HTEOPD-driver.h"
int EOPDReading(bool shortRange, tSensors port)
// The closer an object is to the EOPD, the higher the reading.
// The further away an object is from the EOPD, the lower the reading.
// The EOPD has two modes, short range and long range.
// Short range is relatively more sensitive to movements closer to the EOPD.
// Long range is relatively more sensitive to movements further away from the EOPD.
// Both ranges can get a bit crazy with VERY close objects; test, test, test...
// I'd like to thank Xander Soldaat for the original RobotC code
// but any errors are MINE!
// I'd like to thank Yaya Lu for her help testing this code.
// Xander's web site is http://botbench.com/blog/
// Yaya's web site is http://www.YayaLu.net
// See more of these free tutorials at https://www.drgraeme.net
{
  if (shortRange)
  { // Set EOPD sensor into short range mode
    HTEOPDsetShortRange(port);
  } else
  { // Set EOPD sensor into long range mode
    HTEOPDsetLongRange(port);
  }
  return HTEOPDreadProcessed(port);
}
task main()
{
  int distanceShort, distanceLong;
  while(true)
  {
    // Read the EOPD value to get a number that is approximately related to the
    // distance between the EOPD sensor and a nearby object.
    // The bigger the number, the closer the object.
    // The smaller the number, the further away the object.
    // But these numbers get a bit crazy when the object is VERY close to the EOPD sensor.
    // Make a few tests with differently shaped and coloured objects to make sure. (-:
    // Get an EOPD distance reading in short range mode
    distanceShort = EOPDReading(true, MyEOPD);
    nxtDisplayBigStringAt(0,18, "S: %3i", distanceShort);
    wait1Msec(50);
    // Get an EOPD distance reading in long range mode
    distanceLong = EOPDReading(false, MyEOPD);
    nxtDisplayBigStringAt(0, 38, "L: %3i", distanceLong);
    wait1Msec(50);
  }
}
Before trying to run this RobotC program, you should read the information about the RobotC set-up in section 5.3 below.
5.3 How do I download and run my EOPD test RobotC program?
Before running the program shown in section
5.2, we need to check (and
possibly change) some of the RobotC settings. This is demonstrated
in the videos below. Note that some videos can be expanded to a full screen
by clicking on
![]() or
or
![]() in
the lower right-hand corner of the movie screens.
in
the lower right-hand corner of the movie screens.
Having compiled the program, we can then download it into the
test robot we built in section 3.,
and run it. Videos with the program working are shown below. Note that some videos can be expanded to a full screen
by clicking on
![]() or
or
![]() in
the lower right-hand corner of the movie screens.
in
the lower right-hand corner of the movie screens.
As you can see from the videos above, like any piece of equipment, HiTechnic's EOPD sensor has strengths and weaknesses. The weaknesses are those common to any light-based sensor, sensitivity to variations in reflected light. It strength is that, because it uses pulsed light, it is much less sensitive to ambient light variations than most light-based sensors. This is a marvelous sensor on which to practice the Art of Engineering - making the best of the sensor's strength, and minimizing the consequences of its weaknesses. After all, that is what the practice of Professional Engineering is all about! (-:
5.4 What can I do if I am not familiar with RobotC and want to use it?
30-day trial copies of RobotC 2.0 and RobotC 3.0 can be downloaded from here. Some educational material that can start you off with RobotC is available here. Xander has a tutorial showing how to install his driver suite (necessary for many sensors with RobotC 2.0, but already built-in for RobotC 3.0) here, but it is a bit small and his YouTube version (which can be expanded to full screen) is clearer and can be seen by clicking here. If you want me to expand this portion of this tutorial, send me an email to (Graeme at ieee dot org)
6. How can I get my hands on an EOPD Sensor?
You can purchase an EOPD sensor by going to the manufacturer's web page here. The manufacturer of the EOPD sensor is HiTechnic. You can visit their web site and get more information about their other sensors by going to http://www.HiTechnic.com
Enjoy!
Free "Introducing the EOPD sensor" tutorial - copyright Dr. Graeme Faulkner 2011 - www.DrGraeme.net