
Mentor Notes – LEGO SUMO MindStorm NXT Robots
Summary: These notes have five sections. The first provides a link to a version of this SUMO lesson in Microsoft Word 2003 format. The second provides some Internet links to background information relating to SUMO. The third provides information about how to teach a SUMO robot how to behave. The fourth provides background information on the materials used to construct a SUMO Arena. The fifth provides some additional links to YouTube SUMO-related videos. A printable 6 A4 page Microsoft Word 2003 version of these mentor notes can be obtained by clicking here.
1.0 SUMO Lesson – 3-page format
You can access a three-page version of this SUMO lesson in Microsoft Word 2003 format by clicking here. This version will take a little less paper than printing out the Web format of this lesson.
2.0 SUMO History
A good source of background information of the Japanese art of SUMO wrestling can be found by making sure your computer is connected to the Internet, and then clicking here, or here.
A “.pdf” document that could be used with an overhead projector to introduce students to real Japanese SUMO wrestling can be seen by clicking here.
3.0 Teaching your SUMO Robot
There are many approaches that can be used when you are teaching SUMO Robots how to behave. The main ones used in the home and school are called NXT-G, RoboLab and RobotC.
3.1 NXT-G:
The currently most used approach, and the approach suggested by LEGO as being the easiest to learn, is to teach your Robot how to behave using the NXT-G language.
Note: NXT-G does not work with the older yellow RCX LEGO computer bricks; RoboLab or RobotC (both of which also can be used with the NXT) are possibilities for programming the RCX – see 3.2 RoboLab and 3.3 RobotC further down this web page.
Before using NXT-G, you must first decide what you want your Robot to do. Perhaps the simplest approach is to get your Robot to:-
a) Go forward while it sees black – to do this a light sensor must be used.
b) When it sees (using the light sensor) the silver tape that marks the edge of the SUMO arena, stop the Robot, reverse a little way, turn around a bit, and go back to step 1)
A set of NXT-G instructions to do this is:-
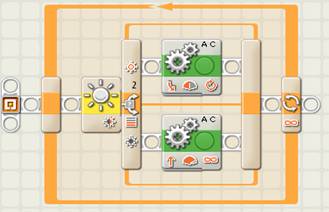
This approach will work, and 15 out of 16 reasonably experienced Grade 5 & 6 (10 to 12 year olds) that I mentored got this far in about 1 ½ hours of a 2-hour fun after-school session (10 minutes start-up, 10 minutes clean-up, and about 10-15 minutes SUMO bouts). If you are trying this for the first time, you will take quite a bit longer, and the video material that can be accessed via the “HELP” item in the main web menu will probably prove useful.
Plans are hardly ever perfect. One problem with this plan is that, if the Robot hits the edge of the arena at a small angle, the Robot can back off the board and lose the SUMO bout (are there other problems as well?)
Some of the more advanced students rapidly observed this, and changed to instructions such as the following:-
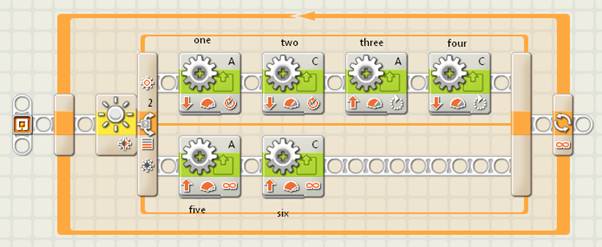
This is a far superior set of instructions to the one first presented above, but it requires a few comments.
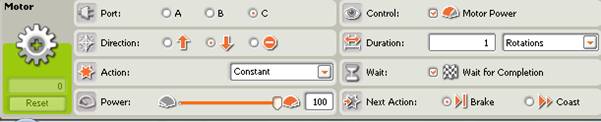
The control panel of the instruction labelled “one” is:-

Note that the “Wait for completion” box is not ticked – hence this motor can operate at the same time as the motor controlled by the next instruction. Also the “motor power” box is checked – this means that if the Robot encounters some resistance (e.g. running into an opposing Robot) the motors can go to “full power” to try & overcome this resistance.
The control panel of the instruction labelled “two” is:-
Again the “Motor Power” is ticked for the same reason as in the previous instruction. This time the “Wait for Completion” box is ticked – if this was not ticked the Robot would proceed to the next instruction before completing the 1 rotations backwards move – not good! These two instructions move the Robot backwards away from the silver edge strip.
The control panel of the instructions labelled “three” (top) and “four” (bottom) are:-


Instruction three (top) goes forward and instruction four (bottom) goes backwards the same amount – hence the Robot spins on the spot – no danger of going backwards over the edge of the arena. Note that again instruction three does not have the “Wait for completion” button ticked, but that the instruction four does – this is to make sure that both motors operate together at the one time, and that the Robot does not go on to another instruction until these instructions have been completed.
The control panel of the instructions labelled “five” (top) and “six” (bottom) are:-


“Unlimited” means that the motors operate at full power forwards over the black surface of the arena until a light sensor sees the silver edge of the arena, and the robot stops the motors, and goes into the “back up and turn” routine.
Several students also tried to get the ultrasonic (sonar) sensor working, on the quite legitimate basis that their Robot could use this sensor to detect where the other Robot was, and charge towards it. No group had time to get this working successfully within the 2-hour time limit allocated for this activity.
3.2 RoboLab:
The older approach, previously used by LEGO, is to use RoboLab. This works for both the present grey LEGO NXT and the older yellow LEGO RCX robots. It is icon-based, like NXT-G, is generally regarded as being harder to learn than NXT-G (but within the capabilities of Grade 5 & 6 students). It currently has the advantage of providing faster responses than NXT-G, and experience suggests that it is more reliable than NXT-G when programs get larger. Mentor notes are not currently available for using RoboLab for LEGO robotic SUMO, but may be made available if there is a demand for them.
3.3 RobotC:
The other main approach is to use RobotC. This is a text-based computer language, being generally regarded as being more appropriate for higher levels of secondary school, perhaps grades 9 & 10. It offers the fastest response of any of these three languages, but is the more difficult to learn. Mentor notes are not currently available for using RobotC for LEGO robotic SUMO, but may be made available if there is a demand for them.
4.0 Construction of the SUMO Arena
I used a straw board[1] sprayed with matt black paint[2] rimmed with silver tape[3]. This gave light sensor calibration readings of about 70 (silver) & 25 (black) – a big enough gap for student’s robots to operate well even if the students were sloppy with their light sensor calibrations.
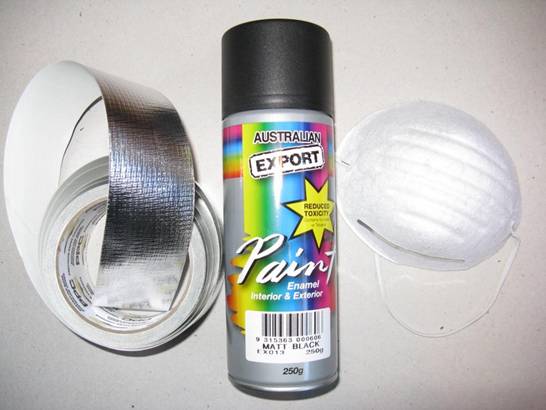
If you decide to make an arena, also get a mask (see illustration above) from the chemist’s or similar shop to use when you spray-paint the strawboard, so that you do not breath in spray paint particles, (these particles can’t be good for your lungs).
4.1 Other options? The original suggestion from Carnegie-Mellon University (see link in the “About” section of this web site) was for a 3 feet by 3 feet arena. This size proved difficult to find in a form that was a reasonable price (that is, as dirt cheap as possible!) The strawboard was a the best substitute I could find, 1050 mm by 800 mm (3 feet 5 inches by 2 feet 7 inches). A hint- don’t use a gloss paint on this board – I tried a gloss red and it was absorbed very patchily - the board looked as if it had measles – ugh!
Regarding a substitute for the strawboard, if you have a tip shop near you, then it is worth a look as these recycling centres at the local refuse dump as they can be a rich source of really cheap material. Other centres that recycle building material could also be worth checking. If these do not prove successful, your next bet could be a building material supplier.
At a building material supplier an option is Masonite sold as a blackboard. This has a nice matt black surface, but I could not find any pieces available near the 3 feet by 3 feet size – you may have more luck.
If you have facilities for chopping up large sheets of building material (I haven’t) you could look at material like an MDF white backing sheet 2400 mm by 1200 mm (6 feet 10 inches by 3 feet 11 inches)[4]. In this case you would use black cloth tape[5] to edge the SUMO arena. An ordinary 3mm MDF board of the same size is about 2/3 the cost of the white-surfaced MDF board, but you would have to factor in the price of the paint to get a matt black or white surface for your SUMO arena. Which way to go? - Up to you… Good luck with your fossicking!
5.0 Other YouTube references
You can find many SUMO videos by searching YouTube using “LEGO SUMO robot” or “NXT SUMO robot”. More videos are being constantly being added, so any list I can give will be well and truly out of date by the time you read this – but a couple of longer videos that may be of background interest to a mentor, but which are perhaps too long for an impatient class to sit through, are ones such as those that can be seen by clicking here, or clicking here, and maybe two associated videos from Grade 5 students here and here.
[1] Obtained from an art supplies store (in my case, “Artery”, Collins Street, Hobart, $4.95).
[2] Obtained from a remainders store (in my case, Chickenfeed, Hobart $3:00); enough for blackening two strawboard sides.
[3] Obtained from a hardware store (in my case Kemp & Denning, Hobart, Aluminium insulation tape, $22:00 for a roll long enough to last you for a really long time)…
[4] Obtainable from a hardware store (in my case, Kemp & Denning for $19)
[5] Also obtainable from hardware stores (in my case, Kemp & Denning, for about $5 - I forget! )-: )