Mentor Notes- Robot Floor Cleaner
Summary: The Robot Floor Cleaner is used to introduce the concept and practice of tight turns. Independent control of two motors allows much finer control of Robot direction and speed. This knowledge will be especially useful if students later on decide to have fun entering any robot competitions…
Teaching your Robot to “Clean The Floor”…
The “Straight
Bit”…
If you are new to this Challenge, you may prefer to use the “Straight Bit” video that can be seen by clicking here broadband, or clicking here dialup. If you just need a reminder, the following text may suffice.
There are many ways for your Robot to clean the floor – starting sideways, starting vertically, going along in parallel lines, going in a spiral – there is no “right” way to clean all the squares, so feel free to use your imagination!
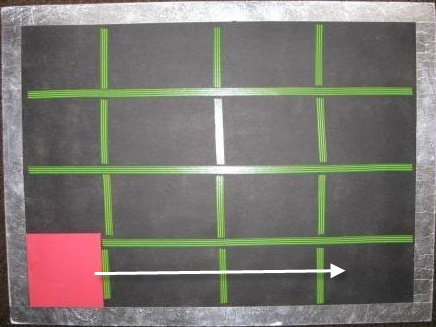
Since for this introduction I have to choose something, I will start my robot going in the path shown by the white arrow below (but feel free to “do your own thing”)!
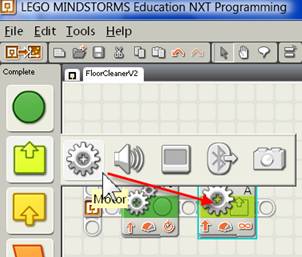
The command to teach your Robot to go forward
is one we have already used. Open up LEGO MindStorms NXT, choose a
name (e.g. FloorCleanerV2) for your new set of Robot instructions
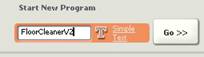 ,
click on the
,
click on the
![]() button
to open up the editor. Then click on the tag indicated by the red
arrow
button
to open up the editor. Then click on the tag indicated by the red
arrow
 to change the menus to
![]() .
Click on
.
Click on
![]() ,
select the
,
select the
![]() option,
and drag it to the position shown by the blue arrow in the image
below.
option,
and drag it to the position shown by the blue arrow in the image
below.
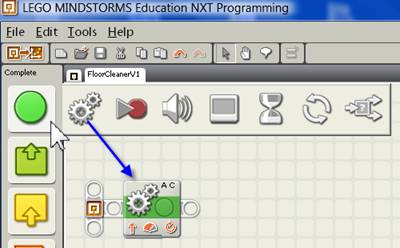
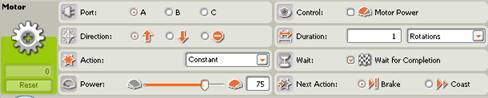
Change the motor commands to fit your Robot (e.g. motors A and C).

Next choose a command to send your Robot to the square marked by the end of the white arrow. Either the “Rotations” or “Seconds” options could be good. Experiment until you can get your Robot to obey you by stopping in the square you where want it to stop.
The Tight
Turn…
If you are new to this Challenge, you may prefer to use the “Tight Turn” video that can be seen by clicking here broadband, or clicking here dialup. If you just need a reminder, the following text may suffice.
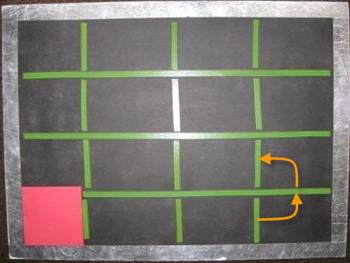
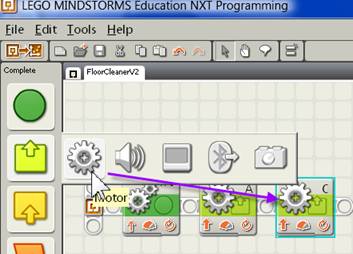
We next want to teach the Robot to make a tight turn so that it points towards the next section of the arena to be cleaned – e.g. as suggested by the orange arrows in the image below.
Click on the
![]() icon
in the LEGO MindStorms editor, then click on the
icon
in the LEGO MindStorms editor, then click on the
![]() option
and drag it down to the position shown by the red arrow in the
diagram below.
option
and drag it down to the position shown by the red arrow in the
diagram below.
To teach our Robot, we can use the following commands.
Note that in this case we only control ONE motor at a time – we have chosen motor A in the example above.
Next we use the same process to choose a
command for motor C. We click on the
![]() icon
again, then click on the
icon
again, then click on the
![]() option
and drag it down to the position shown by the purple arrow in the
diagram below
option
and drag it down to the position shown by the purple arrow in the
diagram below
The commands available for our use to control motor C are shown below:-

Now let us look at our instructions for the tight turn, shown within the blue rectangle below:
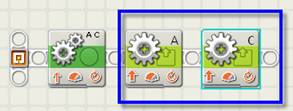
We can see that motor A will run, followed by motor C. If we want both motors A and C to run at the same time, we have to remove the tick in the box controlling motor A that is pointed to by the blue arrow below.

With no tick in this “Wait for Completion” box, motor A will start, and your Robot will then permit Motor C to start before motor A is finished – that is, both motors will run at the same time. Note that you do not change this box for Motor C – leave it ticked (as shown below).

You can now control motors A & C independently. To get a tight turn, you could make motor A go several rotations more than motor C. You may even decide to stop motor C entirely. You can even have motor C going backwards while motor A is going forwards! So many options to play with! Have fun getting your Robot to turn just the right amount to line up for its second long straight cleaning run…
Construction of the Robot Floor Cleaner Arena
For this you will need an arena divided up into squares. A large sheet of paper with marker pencil lines on it, or even a grid of some easy-to-remove tape laid out on the floor of your room would suffice.
In my case I needed an arena that would be able to be transported in a small car when travelling between schools. The easiest & reasonably inexpensive option was a straw board that measured approximately 3 feet 4 inches by 2 foot 6 inches (approximately 1 metre 2 cms. by 76 cms.) that I obtained from the local Art Supplies store.[1]
After some experimentation, a grid the following size was found to allow the students to obtain good results when using the DomaBot (Robot 2) Robot together with the straw board.
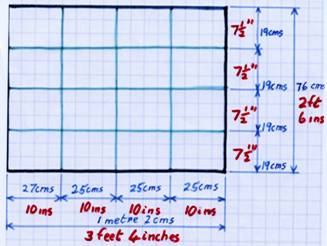
The dimensions of this grid are approximate, and you need not follow these suggested measurements exactly. However be careful if you make the squares smaller than about 19 cms. (7 ½ inches), because the DomaBot will have trouble making a tight enough turn to line up for the next cleaning run. The colour of the lines do not matter for this Challenge, but being careful about these colours and their background colour may allow re-use of this arena in later challenges (see next paragraph).
In my case the Art Store had temporarily run out of strawboards, so I re-used an old SUMO arena (for construction details, see the mentor notes of Challenge 46 Robot SUMO). To separate the to-be-cleaned areas I used lines made from green/yellow electrical tape, because experimentation showed that this gave a reading with the LEGO Light sensor mid-way between black and silver. This would allow the arena to be still used as a SUMO arena if silver/green average readings were used, and as an arena for testing “counting” Challenges if green/black average readings were used.
A word of caution regarding the electrical tape - do not lay it down stretched – if you do it will contract and “lift” overnight and the result will be unusable for robot purposes. Also do not allow the tape to cross itself – it sticks to itself much better than to the strawboard, and will lift where it crosses itself. If gaps are left between tape pieces there is not a problem - the arena pictured below has been in use over several schools for three years with no problems.
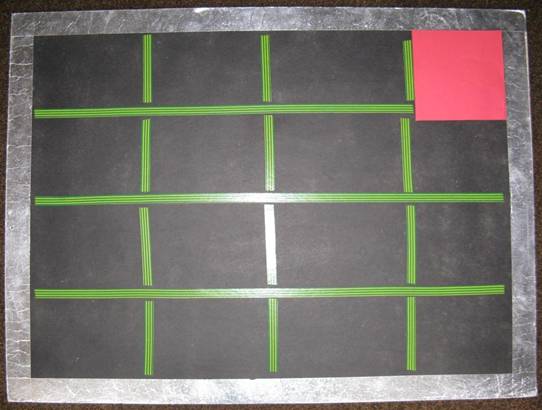
Why the red square with 18 cm. (approx. 7 inch) sides?
One reason is that it gives the robots a place to start cleaning – but imaginative students can actually choose any square from which to start.
The second reason is that the RoboCup Junior Australia Rescue competition rules (click here for the 2009 version) state the Junior Rescue Robots must fit within a pipe 18 cms. inside diameter and 18 cms. high. At a later stage in these sessions this 18 cm. red square is available for use as an early introduction to this type of size restriction. The DomaBot (Robot 2, Challenge 10) is too big for this Junior Rescue competition – something about the size of Margate School’s ClareBot (see Robot 3, Challenge 48) being more appropriate – but this is in the future and just now it is not worth worrying the students with these complications at this early stage of their Robotics fun.
[1] In my case, “Artery”, Collins Street, Hobart, Tasmania; 2008 price $4.95.