Challenge 103 - Following the line using LEGO
NXT Color Sensors
You have added a LEGO MindStorms NXT Color (LEGO’s spelling) Sensor to your
robot, and you would like to use this sensor to follow a line. This tutorial
will give you some hints about how to teach your robot to do this.
103.1 Line following with one Color Sensor.
When your robot has one Color Sensor, to follow the edge of a line your robot is
programmed so that the Color Sensor moved towards, and then away, from the line
edge.
·
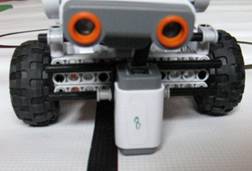
In the left-hand photograph below, we would like our Robot to move forwards so
that the Color Sensor curves from the white surface towards the black line.
·
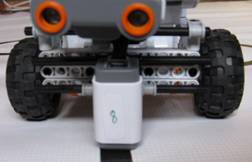
In the right-hand photograph below, after the Color Sensor has reached the black
line we would like our robot to move forwards, so that the Color Sensor curves
this time from the black line, back towards the white surface.
We would like our robot to continue this left-and-right zigzag movement as it advances along the edge of the line. To achieve this, we could use an NXT-G program that looks like the one below.
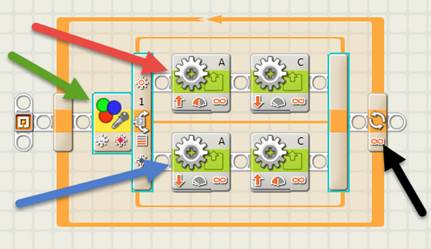
In the
top motor line (red arrow), motor A is forwards about 50%, motor C is backwards
about 20%.
In the
bottom motor line (blue arrow), motor A is backwards about 20%, motor C is
forwards about 50%.
The
number of loop repeats (black arrow) is set to infinity.
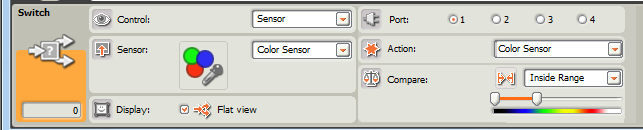
A
suitable color switch block (green arrow),
in Light Sensor mode is shown below:
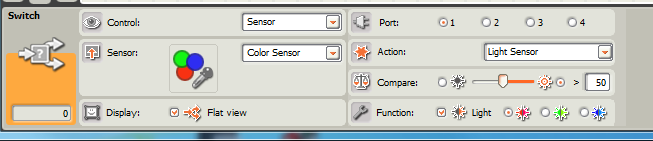
This
worked for me, but the disadvantage is that there does not seem to be an easy
way to calibrate the color sensor in “Light Sensor” mode. I have chosen “50”
which is an average value for a room inside a house, as long as there are no
bright streaks of light falling across the robot’s path. You will have to
experiment to find a good value for your room. The program above followed the
right-hand edge of the line. Because
of this calibration problem, you may prefer to use the Color Sensor Mode.
A
suitable color switch block (green arrow),
in Color Sensor mode
is shown below:
This
also worked for me, however it is worth experimenting with both options to see
which works best with your robot. The program above followed the
left-hand edge of the line.
N.B. Depending on the
orientation of the motors on your robot, you may have to reverse the motor
directions in the sample programs shown above, otherwise your Robot may go
backwards.
Could we usefully modify the “one Color Sensor programs” shown above for use
with two Color Sensors?
103.2 Add a second Color Sensor to your robot
The next step will be to add a second Color Sensor to your robot. There
are many ways to do this. You could use hints from the video “Adding a second
Light Sensor to Clarebot” seen here:
https://www.drgraeme.net/DrGraeme-free-NXT-G-tutorials/ClareBotLight/default.html
as a guide, or invent a way yourself. There are lots of ways you can mount two
Color Sensors on a Robot – experiment and try your very own way to see if
your way works and if your way is better than the suggestions above!
103.3 Programming your robot when it has two Color Sensors available.
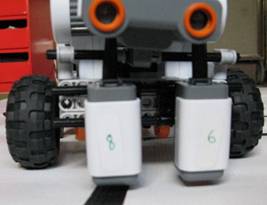
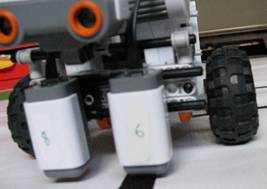
When you have added a second Color Sensor, your robot may look something like
the robots shown below.
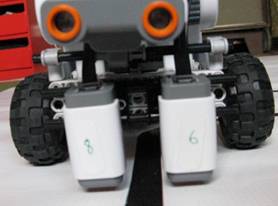
1:
LEFT and RIGHT sensors both on WHITE 2:
LEFT sensor on BLACK, RIGHT on WHITE
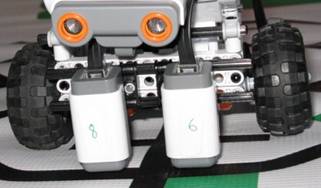
3:
LEFT sensor on WHITE, RIGHT on BLACK 4:
LEFT and RIGHT sensors both on BLACK
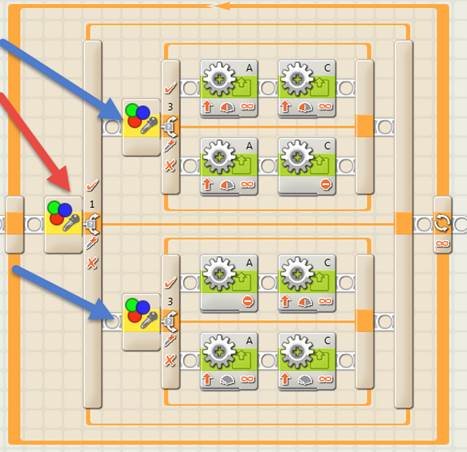
103.3.1 Programming Method 1
It has been suggested that we could program the robot so that each of the Color
Sensors work to keep the robot away from the line by just using the one-Color
Sensor program twice in a row, with the motors and control panels reversed, as
shown below:-
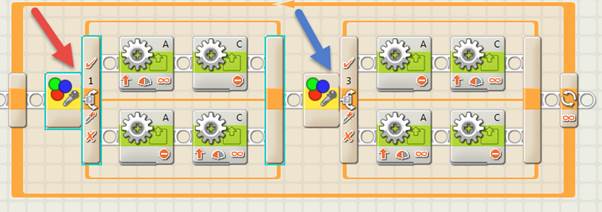
The control panel for the RED Arrow Switch is:
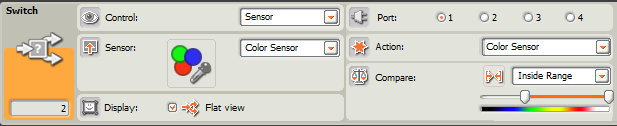
The control panel for the BLUE Arrow Switch
is:

Does this follow a line more quickly than our previous robot using just one
Color Sensor? If it is better, how much faster is it? If it does not work, why
is this not a useful program?
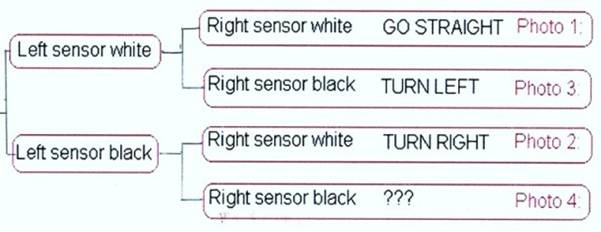
HINT: To work out why it is behaving in the way it is behaving, follow through
the program to see what happens in the cases of photos
1:, 2: and 3:
above; (we can ignore photo 4: for a while). If
you are having trouble understanding what happens in this program, call your
mentor. When you feel you understand how this program works, try Programming
Method 2 method to see if Programming Method 2 is better or worse than
Programming Method 1.
103.3.2 Programming method 2
In this case we should think carefully what we want our robot to do when it
comes across the circumstances shown above in photos 1:,
2: and 3:
(ignore photo 4: at this stage).
One possible way of programming this is shown below.
The Switch Control panels for RED and BLUE arrows are the same as shown in
Section 103.3.1 of these notes.
Can you work out what the program above does if both sensors see black (photo
4 above)? Also, this program is not the only way
to represent the program diagram shown in section 103.3.1 above – can you think
of a different way? How would your program be different to the program above?
103.4 Extension tasks:-
A Microsoft Word 2003 5-page version of this Challenge can be downloaded by clicking here.
LEGO MindStorms NXT Robot Tutorial Challenge 103 - Line following with LEGO NXT Color Sensors - www.DrGraeme.net